How to connect and use a Character LCD using only 2 pins
- Brainy-Bits
- Oct 23, 2020
- 3 min read
Updated: Oct 28, 2020

OVERVIEW
Using a character LCD with an Arduino is nothing new, but let’s make it very simple by using the I2C bus.
By using this little I2C LCD board, we can control the LCD using only 2 wires, and not worry about resistors to adjust the contrast since it’s all included.
To make this tutorial more interesting, we will use the HC-SR04 ultrasonic range finder that we used before and display the results on the LCD.
PARTS USED
HC-SR04 Ultrasonic sensor
Arduino UNO
20x4 LCD with LCD Backpack
These are Amazon affiliate links...
They don't cost you anything and it helps me keep the lights on
if you buy something on Amazon. Thank you!
CONNECTIONS

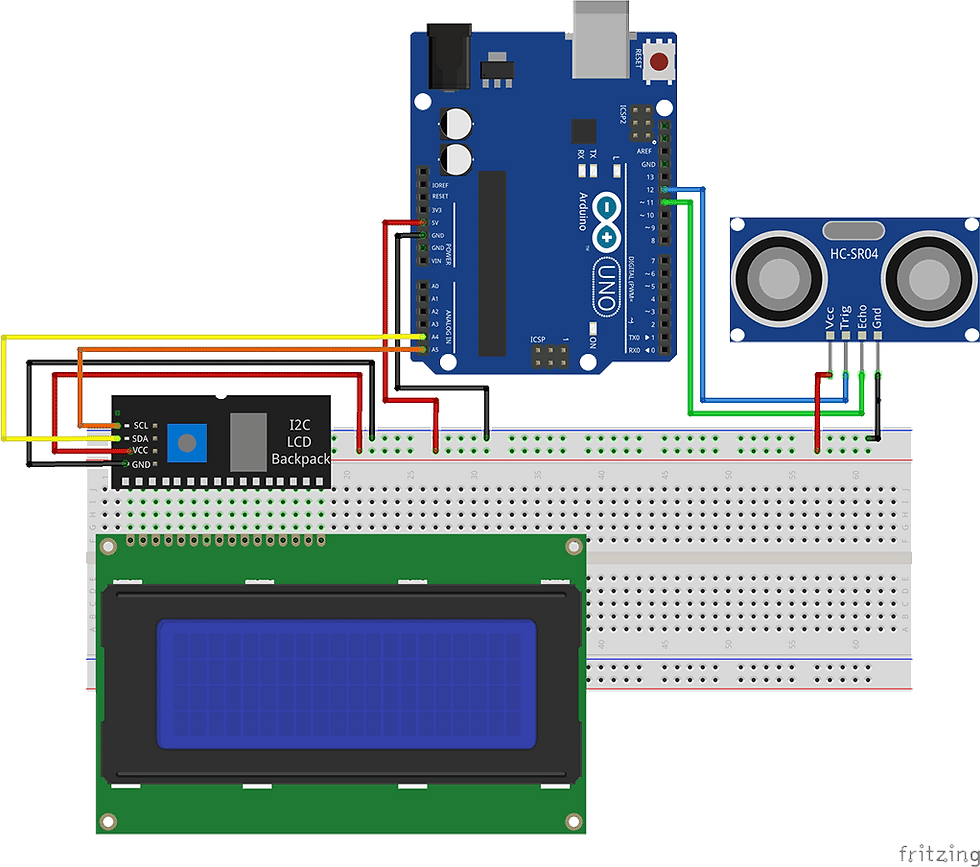
We are using a 20×4 Character LCD so we have 4 lines of 20 characters each available.
The I2C LCD module is connected to pin A4-SDA and A5-SCL.
The HC-SR04 is connected to pin 11-echo and 12-trigger.
VCC and Ground from the Arduino are connected to the breadboard rails .
We then connect the VCC and Ground to both the I2C module and the HC-SR04.
THE CODE
Before we can use the I2C module, we need to find out it’s HEX address so we can communicate with it.
We find the I2C module address by running this “I2C Scanner” sketch on our Arduino.
*note: Watch the tutorial video to see the code in action and the results.
#include "Wire.h"

void setup()
{
Wire.begin();

Serial.begin(9600);
Serial.println("\nI2C Scanner");
}

void loop()
{
byte error, address;
int nDevices;

Serial.println("Scanning...");

nDevices = 0;
for(address = 1; address < 127; address++ )
{
// The i2c_scanner uses the return value of
// the Write.endTransmisstion to see if
// a device did acknowledge to the address.
Wire.beginTransmission(address);
error = Wire.endTransmission();

if (error == 0)
{
Serial.print("I2C device found at address 0x");
if (address<16)
Serial.print("0");
Serial.print(address,HEX);
Serial.println(" !");

nDevices++;
}
else if (error==4)
{
Serial.print("Unknow error at address 0x");
if (address<16)
Serial.print("0");
Serial.println(address,HEX);
}
}
if (nDevices == 0)
Serial.println("No I2C devices found\n");
else
Serial.println("done\n");

delay(5000); // wait 5 seconds for next scan
}
As you can see in the tutorial video, the address for our I2C module is 0X27, so we will use that value in our Sketch to communicate with it.
We will use the “NewPing” library to communicate with the HC-SR04 ultrasonic range sensor.
We are also using the “NewLiquidCrystal” library in our Sketch, this library unlike the one included with the Arduino IDE is more recent, faster and can use the I2C bus, so might as well use it.
You can download the libraries at the bottom of this tutorial page.
*Rename the original LiquidCrystal folder in the Arduino/Libraries to something like LiquidCrystal_Old before extracting the NewLiquidCrystal library, since the folders have the same name, and the original library will conflict with this new one.
As always, please watch the tutorial video for more information.
#include "Wire.h"
#include "LCD.h"
#include "LiquidCrystal_I2C.h"
#include "NewPing.h"

#define I2C_ADDR 0x27  // Add your address here.
#define Rs_pin 0
#define Rw_pin 1
#define En_pin 2
#define BACKLIGHT_PIN 3
#define D4_pin 4
#define D5_pin 5
#define D6_pin 6
#define D7_pin 7

#define ECHO_PIN 11 // Arduino pin tied to echo pin on the ultrasonic sensor.
#define TRIGGER_PIN 12 // Arduino pin tied to trigger pin on the ultrasonic sensor.
#define MAX_DISTANCE 500 // Maximum distance we want to ping for (in centimeters). Maximum sensor distance is rated at 400-500cm.

NewPing sonar(TRIGGER_PIN, ECHO_PIN, MAX_DISTANCE); // NewPing setup of pins and maximum distance.

LiquidCrystal_I2C lcd(I2C_ADDR,En_pin,Rw_pin,Rs_pin,D4_pin,D5_pin,D6_pin,D7_pin);

void setup()
{
 lcd.begin (20,4); //  our LCD is a 20x4, change for your LCD if needed

// LCD Backlight ON
lcd.setBacklightPin(BACKLIGHT_PIN,POSITIVE);
lcd.setBacklight(HIGH);

lcd.home (); // go home on LCD
lcd.print("Range Finder HC-SR04");
}

void loop()
{
 unsigned int uS = sonar.ping(); // Send ping, get ping time in microseconds (uS).
 unsigned int cm = sonar.convert_cm(uS); // Convert into centimeters

 lcd.setCursor (0,1); // go to start of 2nd line
 lcd.print("Current Distance:");
 lcd.setCursor (0,3); // go to start of 4th line
 lcd.print("Ping: ");
 lcd.print(cm);
 lcd.print(" cm ");

 delay(500);
}
TUTORIAL VIDEO
DOWNLOAD
Copy and paste the above code(s) in the Arduino IDE to program your Arduino.
Used Libraries:
Download the NewLiquidCrystal library here:
Download the HC-SR04 library here:

Comentários