
OVERVIEW
If you have worked in an office before, you are probably aware of those RFID cards or Tags that would unlock specific doors depending on your access.
Well let’s make a simple Arduino RFID reader using the RC522 module, and program the Arduino to do something when the right card is detected.
This simple example will read the serial number on the Card or Tag, display it in the serial monitor, sound a buzzer and light up some LEDs.
Of course this project could be interfaced to open doors, switch on a relay, light up an LED, or anything else you can think of.
Keep in mind that there is a lot more you can do with these, like read more information from the card (the Cards used have around 1K of memory), as well as write or replace some information on the Card or Tag.
PARTS USED
WS2812 RGB Stick
Arduino UNO
RFID RC522 Kit
Passive Buzzer Module
These are Amazon affiliate links...
They don't cost you anything and it helps me keep the lights on
if you buy something on Amazon. Thank you!
CONNECTIONS
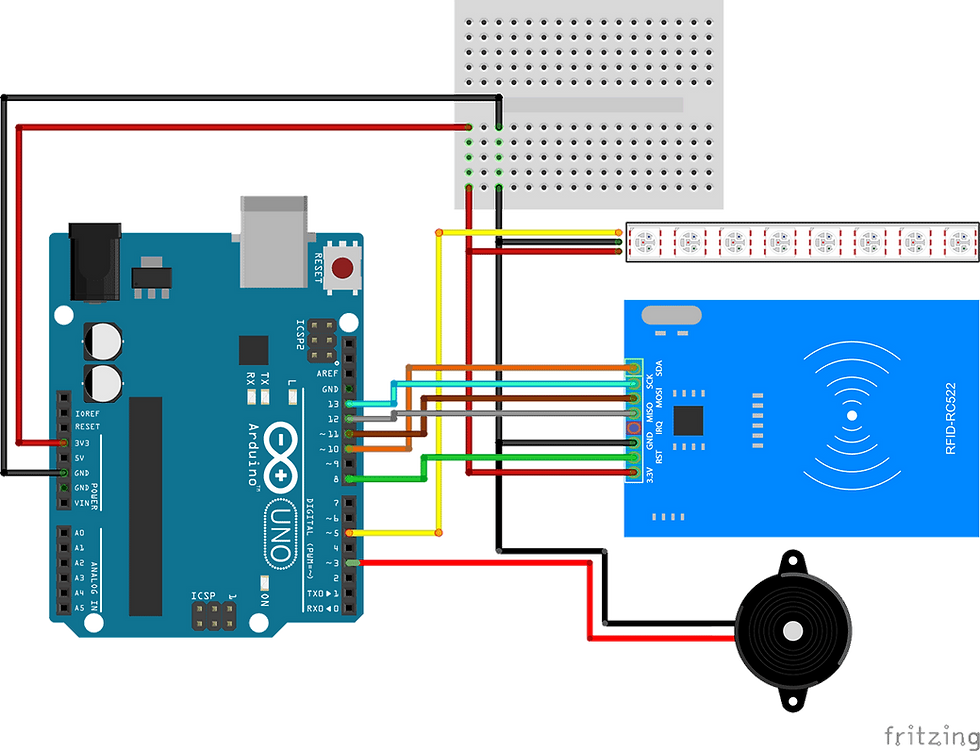
Here are the connection needed for this tutorial:
The GND of the UNO is connected to the negative (-) pin of the buzzer, GND pin of the LED stick and GND pin of the RFID Module
The 3.3V pin of the UNO is connected to the VCC pin of the LED stick and the 3.3V pin of the RFID Module
Pin 8-10-11-12-13 of the UNO are connected to pin RST-SDA-MOSI-MISO-SCK of the RFID Module
Pin 5 of the UNO is connected to the DIN pin of the LED stick
Pin 3 of the UNO is connected to the (+) pin of the Buzzer
THE CODE
We are using the MFRC522 library created by LJOS to communicate with the RC522 module and the FastLED library to control the WS2812 LED stick.
The code below will read the serial number of the Card or Tag when it’s close enough to be energized by the RC522 reader, and then compare that information to the value that we entered in the array called ‘GoodTagSerialNumber’, which is 0x95-0xEB-0x17-0x53.
If the serial numbers match, then the buzzer will sound a short tone 3 times and light up the LED stick green, if not then a longer tone will be sounded and the LED stick will be red.
As always for more information about the tutorial and explanation of the code please watch our tutorial video.
/* Start of Code */

/* Simple RFID Arduino Sketch(RC522)

Created by Yvan / https://Brainy-Bits.com
This code is in the public domain...
You can: copy it, use it, modify it, share it or just plain ignore it!
Thx!

The MFRC522 Library used, was created by LJOS here: https://github.com/ljos/MFRC522
The FastLED Library used, was created by focalintent here: https://github.com/FastLED/FastLED/releases

*/

#include <MFRC522.h> // Include of the RC522 Library
#include "FastLED.h" // Include of the FastLED library
#include <SPI.h> // Used for communication via SPI with the Module

// WS2812 RGB Stick connection
#define led_pin 5 // Pin 5 connected to DIN of RGB Stick
#define NUM_LEDS 8 // # of WS2812 LEDs on stick
CRGB leds[NUM_LEDS]; // FastLED Library Init

#define SDAPIN 10 // RFID Module SDA Pin is connected to the UNO 10 Pin
#define RESETPIN 8 // RFID Module RST Pin is connected to the UNO 8 Pin

#define Buzzer 3 // Pin 3 connected to + pin of the Buzzer

byte FoundTag; // Variable used to check if Tag was found
byte ReadTag; // Variable used to store anti-collision value to read Tag information
byte TagData[MAX_LEN]; // Variable used to store Full Tag Data
byte TagSerialNumber[5]; // Variable used to store only Tag Serial Number
byte GoodTagSerialNumber[5] = {0x95, 0xEB, 0x17, 0x53}; // The Tag Serial number we are looking for

MFRC522 nfc(SDAPIN, RESETPIN); // Init of the library using the UNO pins declared above

void setup() {
pinMode(Buzzer, OUTPUT); // Set buzzer pin to an Output pin
digitalWrite(Buzzer, LOW); // Buzzer Off at startup
SPI.begin();
Serial.begin(115200);

FastLED.addLeds<NEOPIXEL,led_pin>(leds, NUM_LEDS); // Setup FastLED Library
FastLED.clear();

// Start to find an RFID Module
Serial.println("Looking for RFID Reader");
nfc.begin();
byte version = nfc.getFirmwareVersion(); // Variable to store Firmware version of the Module

// If can't find an RFID Module
if (! version) {
Serial.print("Didn't find RC522 board.");
while(1); //Wait until a RFID Module is found
}

// If found, print the information about the RFID Module
Serial.print("Found chip RC522 ");
Serial.print("Firmware version: 0x");
Serial.println(version, HEX);
Serial.println();
}

void loop() {

// Light up starting LED's
for (int x = 0; x < 8; x++) {
leds[x] = CRGB::Blue;
}
FastLED.setBrightness(50);
FastLED.show();

String GoodTag="False"; // Variable used to confirm good Tag Detected

// Check to see if a Tag was detected
// If yes, then the variable FoundTag will contain "MI_OK"
FoundTag = nfc.requestTag(MF1_REQIDL, TagData);

if (FoundTag == MI_OK) {
delay(200);

// Get anti-collision value to properly read information from the Tag
ReadTag = nfc.antiCollision(TagData);
memcpy(TagSerialNumber, TagData, 4); // Write the Tag information in the TagSerialNumber variable

Serial.println("Tag detected.");
Serial.print("Serial Number: ");
for (int i = 0; i < 4; i++) { // Loop to print serial number to serial monitor
Serial.print(TagSerialNumber[i], HEX);
Serial.print(", ");
}
Serial.println("");
Serial.println();


// Check if detected Tag has the right Serial number we are looking for
for(int i=0; i < 4; i++){
if (GoodTagSerialNumber[i] != TagSerialNumber[i]) {
break; // if not equal, then break out of the "for" loop
}
if (i == 3) { // if we made it to 4 loops then the Tag Serial numbers are matching
GoodTag="TRUE";
}
}
if (GoodTag == "TRUE"){
Serial.println("Success!!!!!!!");
Serial.println();
for(int x = 0; x < 8; x++) {
leds[x] = CRGB::Green;
}
FastLED.show();
for (int y = 0; y < 3; y++){
digitalWrite (Buzzer, HIGH) ;// Buzzer On
delay (50) ;// Delay 1ms
digitalWrite (Buzzer, LOW) ;// Buzzer Off
delay (50) ;// delay 1ms
}
delay(1500);
}
else {
Serial.println("TAG NOT ACCEPTED...... :(");
Serial.println();
for(int x = 0; x < 8; x++) {
leds[x] = CRGB::Red;
}
FastLED.show();
for (int y = 0; y < 3; y++){
digitalWrite (Buzzer, HIGH) ;// Buzzer On
delay (300) ;// Delay 1ms
digitalWrite (Buzzer, LOW) ;// Buzzer Off
delay (400) ;// delay 1ms
}
delay(500);
}
}
}

/* End of Code */
TUTORIAL VIDEO
DOWNLOAD
Copy the above Sketch code in your Arduino IDE software to program your Arduino.
Used Libraries:
Download The MFRC522 Library created by LJOS here:
Download The FastLED Library created by focalintent here: https://github.com/FastLED/FastLED/releases
Once downloaded, just extract the content of the zip files inside your “arduino/libraries” folder.
Comments