
Turn an Analog Joystick module into a PC mouse with an Arduino
- Brainy-Bits

- Oct 23, 2020
- 3 min read
Updated: Oct 28, 2020

OVERVIEW
Following in the footsteps of our last tutorial, we will use an Analog Joystick module with the Leonardo to simulate a mouse and control the cursor on a PC.
This could be useful if you’re building an kiosk or arcade cabinet and don’t want to have a mouse connected to control the cursor.
The Arduino Leonardo and Micro both have the native capability to emulate USB devices.
in this tutorial we will use the joystick to move the cursor, use the integrated joystick switch to activate the emulation, and an arcade button to act as the left mouse click.
PARTS USED
Arduino Leonardo
Joystick Module
Arcade Button
These are Amazon affiliate links...
They don't cost you anything and it helps me keep the lights on
if you buy something on Amazon. Thank you!
CONNECTIONS
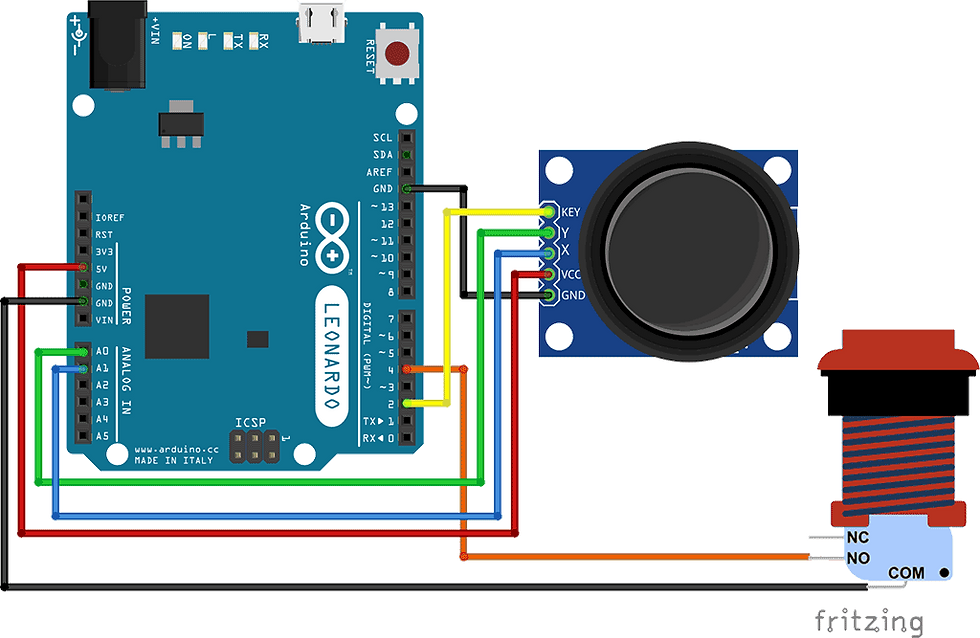
We need 5 connections to the joystick.
The connection are : Key, Y, X, Voltage and Ground.
“Y and X” are connected to A0, A1. “Key” is connected to Pin 2.
The arcade button NO connector is connected to Pin 4 and COM pin to GND.
THE CODE
The way the Leonardo or Micro controls the mouse cursor is by updating the position when the analog joystick is read.
Meaning that the position is relative to the prior position the cursor was at.
So when you release the joystick and it returns to the center position, the cursor will stay where it is and not return to the center of the screen, just like a regular mouse.
The analog joystick as an input range from 0 to 1023, we will translate this to -10 to 10 to control the cursor in our code.
You can change the value of the “range” variable to make the cursor more faster or slower.
The higher the number the faster the mouse cursor will move.
Don’t forget to check out our Tutorial video for more information.
// Define Pins

const int startEmulation = 2;      // switch to turn on and off mouse emulation
const int mouseLeftButton = 4;    // input pin for the mouse left Button
const int joystickX = A1;         // joystick X axis
const int joystickY = A0;         // joystick Y axis

// parameters for reading the joystick:
int cursorSpeed = 10;               // output speed of X or Y movement
int responseDelay = 5;        // response delay of the mouse, in ms
int threshold = cursorSpeed/4;      // resting threshold
int center = cursorSpeed/2;         // resting position value

boolean mouseIsActive = false;    // whether or not to control the mouse
int lastSwitchState = LOW;        // previous switch state

void setup() {
  pinMode(startEmulation, INPUT_PULLUP);   // the switch pin
  pinMode(mouseLeftButton, INPUT_PULLUP);  // the left mouse button pin

  Mouse.begin();  // take control of the mouse
}

void loop() {
  // read the switch:
  int switchState = digitalRead(startEmulation);

  // if it's changed and it's high, toggle the mouse state:
  if (switchState != lastSwitchState) {
    if (switchState == LOW) {
      mouseIsActive = !mouseIsActive;
    }
  }

  // save switch state for next loop:
  lastSwitchState = switchState;

  // read and scale the two axes:
  int xReading = readAxis(A1);
  int yReading = readAxis(A0);

  // if the mouse control state is active, move the mouse:
  if (mouseIsActive) {
    Mouse.move(xReading, yReading, 0); // (x, y, scroll mouse wheel)
  }

  // read the mouse button and click or not click:
  // if the mouse button is pressed:
  if (digitalRead(mouseLeftButton) == HIGH) {
    // if the mouse is not pressed, press it:
    if (!Mouse.isPressed(MOUSE_LEFT)) {
      Mouse.press(MOUSE_LEFT);
      delay(100); // delay to enable single and double-click
    }
  }

  // else the mouse button is not pressed:
  else {
    // if the mouse is pressed, release it:
    if (Mouse.isPressed(MOUSE_LEFT)) {
      Mouse.release(MOUSE_LEFT);
    }
  }

  delay(responseDelay);
}

/*
  reads an axis (0 or 1 for x or y) and scales the
 analog input range to a range from 0 to
 */

int readAxis(int thisAxis) {
  // read the analog input:
  int reading = analogRead(thisAxis);

  // map the reading from the analog input range to the output range:
  reading = map(reading, 0, 1023, 0, cursorSpeed);

  // if the output reading is outside from the
  // rest position threshold,  use it:
  int distance = reading - center;

  if (abs(distance) < threshold) {
    distance = 0;
  }

  // return the distance for this axis:
  return distance;
}
TUTORIAL VIDEO
DOWNLOAD
Copy and Paste the above Sketch/Code in your Arduino IDE.


Great guide on turning an analog joystick into a PC mouse with Arduino! This project is super useful for DIY enthusiasts. By the way, innovative tech like this makes me think about how creative solutions apply to different fields, even bedbugs removal, where smart techniques are key for efficiency!